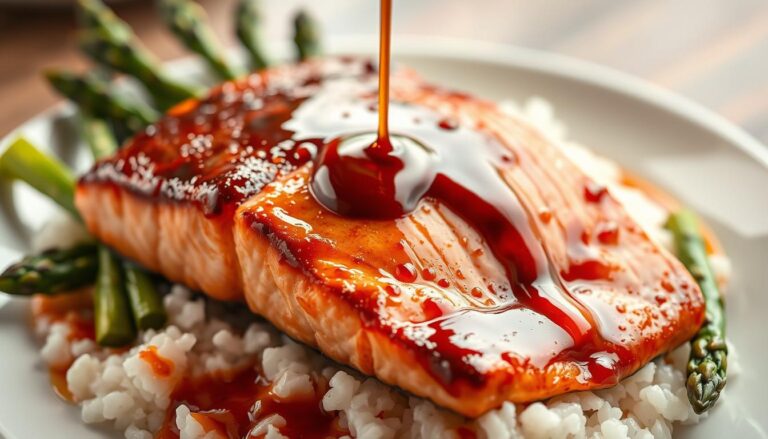

Baked Teriyaki Salmon: A Tasty, Easy, and Healthy Dish You’ll Love
Baked Teriyaki Salmon is the perfect quick dinner when you want something healthy, flavorful, and easy to prepare. You know that moment when a weeknight needs rescue and dinner must be both fast and comforting? This recipe gives you a glossy, sweet-savory glaze and a tender, flaky fish that feels special without fuss.
In about 25–30 minutes total with simple prep you can preheat oven 400 and have a reliable, protein-rich meal. You can bake fillets whole or cut them into cubes that finish in fewer minutes. Finish under the broiler for a few minutes to crisp the top and brush on extra sauce for shine.
Keep the skin on to lock in moisture; it slips off after cooking for neat portions. Store extra glaze in a container and reheat for lunches or meal prep. This is an easy teriyaki weeknight recipe that delivers big flavor with little effort.
Why You’ll Love This Teriyaki Salmon Recipe
This dish proves that quick meals can still feel special. You get a glossy, savory finish with a short total time that fits weeknights or last-minute dinner plans.
Ready in under 30 minutes with simple prep
From prep to plate in about 25–30 minutes. Bake at 400°F for 12–18 minutes depending on thickness; cubes finish in roughly 10–14 minutes. Broil 1–2 minutes to caramelize the top.
Tender, flaky texture with a glossy teriyaki glaze
The oven method locks in moisture while the quick broil adds a shiny crust. A homemade teriyaki sauce made with low-sodium soy sauce, fresh orange or lemon juice, honey or maple, garlic, and ginger brings bright flavor without excess fat.
- The sauce is easy to tweak—use honey, maple, or a touch of sugar to adjust sweetness.
- Serve with rice and a steamed side for a complete meal or pack for meal prep; it keeps 3–4 days refrigerated.
- Add sesame seeds or chili flakes to customize texture and heat.
Ingredients for Homemade Teriyaki Sauce and Salmon
Start by choosing fillets that match your time and texture goals—thinner cuts cook faster, thicker pieces hold more moisture.
Salmon basics: Pick 4–6 oz fillets. Skin-on helps keep the fish juicy; the skin slips off after cooking if you prefer to serve skinless. Wild-caught types like Sockeye or Coho are leaner and cook faster. Farmed Atlantic or King have more fat and are forgiving for beginners.
Teriyaki sauce essentials: Build your homemade teriyaki sauce with low-sodium soy sauce, fresh ginger, and minced garlic. Choose honey, maple, or a pinch of sugar as the sweetener. Reserve a cup of sauce to brush on at the end for shine.
“Use fresh aromatics and a touch of citrus to lift the glaze and keep flavors bright.”
- Optional add-ins: sesame oil, chili flakes, or a splash of orange or lemon juice.
- Garnishes and sides: sesame seeds, sliced green onion, steamed rice or broccoli, or quinoa.
| Choice | Texture | Cook Time |
|---|---|---|
| Wild-caught (Sockeye/Coho) | Lean, firm | Faster (thin) |
| Farmed (Atlantic/King) | Fattier, richer | Slower, forgiving |
| Skin-on vs Skinless | Skin-on keeps juice; skinless for cubes | Skin-on slightly longer |
How to Make Baked Teriyaki Salmon (Oven 400°F)
Start simply: preheat oven to 400°F and lightly grease a baking dish or line a sheet pan so the fish releases cleanly after cooking.
Marinate for flavor: whisk your teriyaki sauce, then marinate the fillets about 20 minutes. This adds depth without making the texture mushy.
Timing and doneness
Bake fillets 12–18 minutes depending on thickness; cubes finish in about 10–14 minutes. Start checking at 10–12 minutes and use the fork flake test — the fish should separate easily and slide off the skin.
Finish and serve
For a restaurant-style top, broil 1–2 minutes to caramelize the glaze without drying the flesh. Simmer any reserved sauce for 3–4 minutes to thicken, then brush or drizzle it over the cooked pieces for shine and extra flavor.
- Keep skin-on during baking to preserve moisture; slide it off when plating.
- If cooking from frozen, add 5–10 minutes and spoon extra sauce on after baking.
- Consistent oven rack placement and pan size keep baking time predictable.
Make-Ahead Teriyaki Sauce: Sweetness and Thickness Options
Make your sauce ahead to cut weeknight prep and lock in consistent flavor. A ready jar saves time and gives you control over sweetness and texture when you cook.

Sweeteners to match your taste
Choose a sweetener that fits the profile you want. Honey adds a floral note, maple syrup gives rich depth, brown sugar delivers that classic takeout balance, and agave keeps things mild.
Start with a small amount and taste. If you prefer, swap the sugar for a different sweetener without changing the basic method.
How to thicken without lumps
To thicken, dissolve a teaspoon of cornstarch, arrowroot, tapioca, rice flour, or a gluten-free flour in a little cool water first.
Whisk the slurry into the simmering sauce and stir for 3–4 minutes until it becomes glossy and clings to the fish. Use low-sodium soy, tamari, or coconut aminos to manage salt.
Make a cup of sauce, reserve a bit to brush at the end, refrigerate in a jar, and whisk before using. This way you can make teriyaki once and speed dinner all week.
Alternative Cooking Methods: Air Fryer, Stovetop, and Grill
Switching to an air fryer, skillet, or grill gives you fast results and the same glossy glaze without relying on the oven.
Air fryer
Preheat to 380°F. Cook cubes for 8–12 minutes and fillets for 10–14 minutes. Brush with warm sauce after cooking for shine and extra flavor.
Stovetop
Heat a nonstick or cast-iron pan and pan-sear the fish about 3 minutes per side to brown the surface.
Then add a few spoonfuls of sauce and simmer until it thickens and coats the fish. Rest briefly before serving.
Grill and quick tips
- Grill over medium heat; brush glaze near the end to avoid burning.
- Keep extra sauce warm so you can brush again right before plating.
- You can use the same method to make teriyaki chicken or shrimp for variety.
“When you can’t use the oven, these methods keep the inside moist with a caramelized exterior.”
baked teriyaki salmon Serving Ideas and Flavor Pairings
Pick a starchy base and a couple of fresh veggies to build bowls that highlight the main flavor.
Serve with rice, quinoa, or cauliflower rice for a reliable foundation. Drizzle leftover thickened sauce over the grain or riced veg to tie the plate together.
For greens and texture, add steamed broccoli, shelled edamame, or a crisp salad. A frozen stir-fry mix also speeds things up and keeps prep under control.
“Keep a small bowl of warmed sauce at the table so everyone can adjust glaze intensity to taste.”
Easy assembly ideas
- Build simple bowls with rice or quinoa, steamed broccoli, and sliced scallions, finishing with a spoon of sauce.
- Sprinkle sesame seeds for crunch and a nutty lift that complements the glaze.
- For a lighter option, place the fish over cauliflower rice and drizzle extra teriyaki sauce.
- Roast broccoli or sheet-pan veggies while the fish cooks in the oven to save minutes and effort.
| Pairing | Why it works | Serving tip |
|---|---|---|
| Rice or quinoa | Absorbs sauce, balances richness | Drizzle reserved sauce over grains |
| Broccoli & edamame | Bright, textural contrast | Steam or roast for color |
| Cauliflower rice | Grain-free, lighter base | Top with extra sauce for satisfaction |
Nutrition Snapshot: Protein, Fat, and Sodium Notes
Per serving, expect a hearty protein boost and a fat range that depends on the cut you choose.
Typical macros: A standard fillet delivers about 34–36g of protein and roughly 12–20g of fat depending on whether you pick a lean wild cut or a fattier farmed piece.
Sodium and sugar come mainly from the teriyaki sauce and how much of it you add after cooking. Use low-sodium soy or tamari and brush sparingly to lower both salt and added sugar per serving.
What to expect per serving and how sauces affect macros
- High protein per serving supports fullness and recovery.
- Fat varies with wild versus farmed choices—thicker farmed fillets raise fat totals.
- Control sodium by keeping most sauce off the plate and using low-sodium soy.
- Limit extra glaze after cooking to cut sugars; reserve sauce and add just before eating for meal prep.
- Measure about a cup of cooked sides to keep portions consistent and balanced.
“Adjust glaze quantity to steer macros without losing the core flavor profile.”
| Item | Typical per serving | Tip |
|---|---|---|
| Protein | 34–36 g | One fillet provides consistent protein |
| Fat | 12–20 g | Choose wild for lower fat, farmed for richer texture |
| Sodium | Varies | Use low-sodium soy/tamari and add less sauce |
Storage, Reheating, and Leftovers
How you cool and pack leftovers makes the difference between dry fish and a juicy meal. Cool cooked salmon completely before sealing it in an airtight container to prevent sogginess from trapped steam.
Refrigerate 2–4 days for best quality. For longer storage, freeze portions up to 3 months in a freezer-safe container and label with the date.

Best ways to reheat
Warm gently in the oven for even heat, or reheat on the stovetop in a covered skillet with a splash of water to keep flakes tender.
If you need speed, microwave for 60–90 seconds, checking every 30 seconds to avoid overcooking.
Cooling, thawing, and serving tips
- Keep any extra sauce separate and add after reheating to restore shine.
- Thaw frozen portions overnight in the fridge or use the microwave defrost before heating.
- Pack meal prep boxes with rice and vegetables in separate compartments to preserve texture.
- A light drizzle of warm sauce fixes dryness; avoid reheating more than once.
| Task | Timing | Container |
|---|---|---|
| Fridge storage | 2–4 days | Airtight container |
| Freezing | Up to 3 months | Freezer-safe container |
| Microwave reheat | 60–90 seconds | Covered, vent briefly |
| Oven or stovetop | Reheat gently | Use foil or a covered skillet |
Pro Tips and Troubleshooting
A few practical tweaks help prevent dry fillets and boost glaze absorption every time.
Wild vs. farmed: wild caught fish is leaner and cooks faster, so start checking a couple of minutes early. Farmed fillets are thicker and more forgiving; they tolerate a bit more baking without drying out.
Thickness matters. Consider the thickness salmon when timing; thinner pieces need less time. For consistent results, preheat oven to 400°F and use a lightly greased pan so heat distributes evenly.
Skin-on, cubes, and moisture
Leave the skin on during baking for maximum moisture; it slides off easily after resting if you prefer skinless portions.
Cubed salmon cooks faster and gives more surface for glaze to cling to, while whole fillets stay juicier under the skin.
Gluten-free swaps and frozen tips
Use tamari or coconut aminos as a gluten-free alternative to soy sauce when making your sauce.
If you cook from frozen, add 5–10 minutes to the time and plan to brush on extra sauce after baking—frozen pieces don’t absorb glaze as well during cooking.
“Let the fish rest a couple of minutes after cooking; it finishes gently and flakes more consistently.”
- Track time but rely on the flake test to avoid overcooking.
- Simmer a thin glaze briefly to thicken; thin with a splash of water if too stiff.
Conclusion
A quick, glaze-forward finish makes this dish feel like a weekday treat without extra fuss.
You now have a dependable teriyaki salmon recipe with clear oven times (400°F, 12–18 minutes; cubes 10–14), a short marinate, and a broil to caramelize the top. Brush with warm sauce made with low-sodium soy or tamari and sweeten with honey, maple, or brown sugar for a glossy finish.
Use the air fryer for speed, serve over rice or in a bowl with broccoli and edamame, and keep extra glaze to make teriyaki ahead for easy weeknights. Store leftovers 3–4 days or freeze up to 3 months. This baked teriyaki salmon recipe is flexible, fast, and perfect for dinner rotation.