Fried Turkey Injection: Tips & Tricks for a Perfectly Juicy Bird
Fried Turkey Injection gives your bird the deep flavor and moisture that turns a simple meal into a showstopper. You want the dish that makes everyone gasp when it hits the table — golden, crisp, and bursting with bold seasoning. With the right injection mix, you can lock in juicy flavor before the oil ever heats up and serve a turkey that’s tender, aromatic, and unforgettable.
This guide shows you how targeted injection and smart drying make a crisp, juicy bird every time.
You’ll follow a clear recipe that pairs a Cajun Creole butter-and-oil injection, demonstrated by Heath Riles BBQ, with safe frying methods. Start by smoking the blend about 45 minutes, then strain and cool before you inject in a grid across breasts and thighs.
Set your fryer at 350°F and plan about 3.5–4 minutes per pound. Finish when the thickest parts reach 160–165°F, then rest before carving. Always fry outdoors and use a fully thawed, dry skin bird to cut splatter and crisp the skin.
Along the way you’ll learn when injection beats a marinade or brine, simple gear picks, and safe storage windows so leftovers serve well later.
Table of Contents
Why Injecting a Fried Turkey Works for Moist, Flavorful Meat
You get flavor where it matters most: when you inject turkey you force a smooth, water-based marinade into dense muscle so seasoning travels from the center outward. This reduces dry bites and makes the whole bird taste consistent.
A proper liquid must be smooth and lump-free. Any ingredients should be blended or strained so the needle flows easily. Small solids or thick pastes will clog the syringe and create pockets that weep during cooking.
Injection beats a long soak when you need results fast. Brines and rubs can take hours and may never reach the deepest meat. With a clean, saline-based mix you deliver salt, sauce, and Cajun notes right to the breast and thighs in minutes.
Timing matters for a crisp surface. For deep frying, inject just before you cook so the skin stays dry and will crisp properly. For roasting or smoking, you can inject earlier to let flavors diffuse longer through the meat.
- Speeds flavor penetration compared to marinating.
- Works for chicken and other poultry with varied thickness.
- Best with strained, water-soluble ingredients to avoid clogs.
Safe Prep for Deep-Frying: Thawing, Drying, and Setup
Prep matters more than flashy technique. Before you heat the oil, handle thawing, dryness, and layout so the cook stays safe and on schedule.
Thaw fully and fry outdoors for safety
Make sure your turkey is completely thawed. Ice in the cavity or joints causes violent oil eruptions when the bird hits hot oil.
Never cook a partly frozen bird. Fry outdoors on level ground and position the fryer away from structures. Keep a fire extinguisher close and clear the area of kids and pets.
Dry the skin thoroughly to keep splatter down and crisp the exterior
Pat the skin and cavity dry with paper towels, then let the bird air-dry in the refrigerator for several hours if possible. Less surface moisture means less splatter and better skin crisping.
Measure pot displacement with water first, then dry the pot completely. Set the fryer oil to a steady 350°F and verify the temp with a reliable thermometer.
- Remove giblets and plastic; tuck wings and trim loose skin so nothing snags when lowering the bird.
- Stage the bird on a sheet pan after you inject to avoid moving it; confirm you have enough high-smoke-point oil on hand.
- Plan your time: preheat the oil, inject just before lowering, and have your resting area ready so the cook flows in hours, not panics.
Ingredients for Your Injection Marinade: Cajun Heat, Citrus, and Savory Depth
Start by choosing whether you want a rich, smoked butter base or a bright, water-forward mix to carry flavor deep into the meat.
Cajun Creole butter-and-oil base for rich, garlicky flavor
Butter, garlic, lemon, and herbs
Use a blend of melted butter and olive oil with fresh garlic, garlic powder, lemon juice, sage, and rosemary for a full, savory profile. Heath Riles smokes this mix about 45 minutes, then strains and cools it before use.
Beer or broth, Worcestershire, honey, and hot sauce for a clean, water-soluble inject
Beer or broth for a lighter marinade
For a cleaner, water-based option, whisk 12 oz light beer or low-sodium chicken broth with 2 tbsp Worcestershire, 2 tbsp honey, 5–6 drops hot sauce, and 1 tsp coarse Kosher salt. Whisk gently—don’t shake carbonated liquids.
Strain or blend to avoid clogged needles (fine powders over flakes)
Straining and ingredient form
Grind onion or herb notes to a fine powder and use garlic powder when possible. Then blend and strain so the mix flows smoothly through your needle.
| Base | Key additions | Benefit |
|---|---|---|
| Butter & oil | Garlic, lemon, sage, Cajun rub | Rich mouthfeel; bold Cajun flavor |
| Light beer or broth | Worcestershire, honey, hot sauce, salt | Less fat; keeps skin drier for frying |
| Technique | Blend, strain, cool to room temp | Prevents clogs and fat separation |
- Use coarse Kosher salt for even seasoning.
- Keep citrus pulp out by straining thoroughly.
- Keep the final mix at room temperature so butter stays liquid but not hot.
Gear You’ll Need: Injector, Deep Fryer, Thermometer, and More
Before you heat oil, gather a few heavy-duty tools that save time and reduce risk. The right kit makes the whole cook safer and more predictable.
Choose a sturdy metal injector with a needle sized for fine liquids. Metal bodies give consistent pressure through dense meat and cut clogging. Keep a small cup or pitcher on hand to portion your mix and avoid air pockets in the injector.
Set your deep fryer to 350°F and confirm the actual temp with a trusted probe or instant-read thermometer. Use a high-smoke-point oil such as peanut, canola, or refined soybean and add enough to submerge the bird without overflowing.

- Use a vertical roasting stand to lower and lift the bird safely.
- Wear heat-resistant gloves and long sleeves; closed-toe shoes protect from splashes.
- Line a sheet pan with foil for staging and resting; it makes cleanup easy.
- Keep paper towels, a reliable ThermoWorks thermometer, and measuring tools nearby.
| Item | Why it matters | Tip |
|---|---|---|
| Metal injector | Delivers liquid evenly into breast and thighs | Rinse immediately after use to store clean |
| Deep fryer / pot | Maintains steady oil temp for even cooking | Measure displacement with water to set oil volume |
| Thermometer | Confirms doneness and temp accuracy | Brands like ThermoWorks read fast and true |
| Sheet pan + foil | Staging, resting, and drip control | Line pan before you start to save time |
Fried turkey injection: step-by-step guide
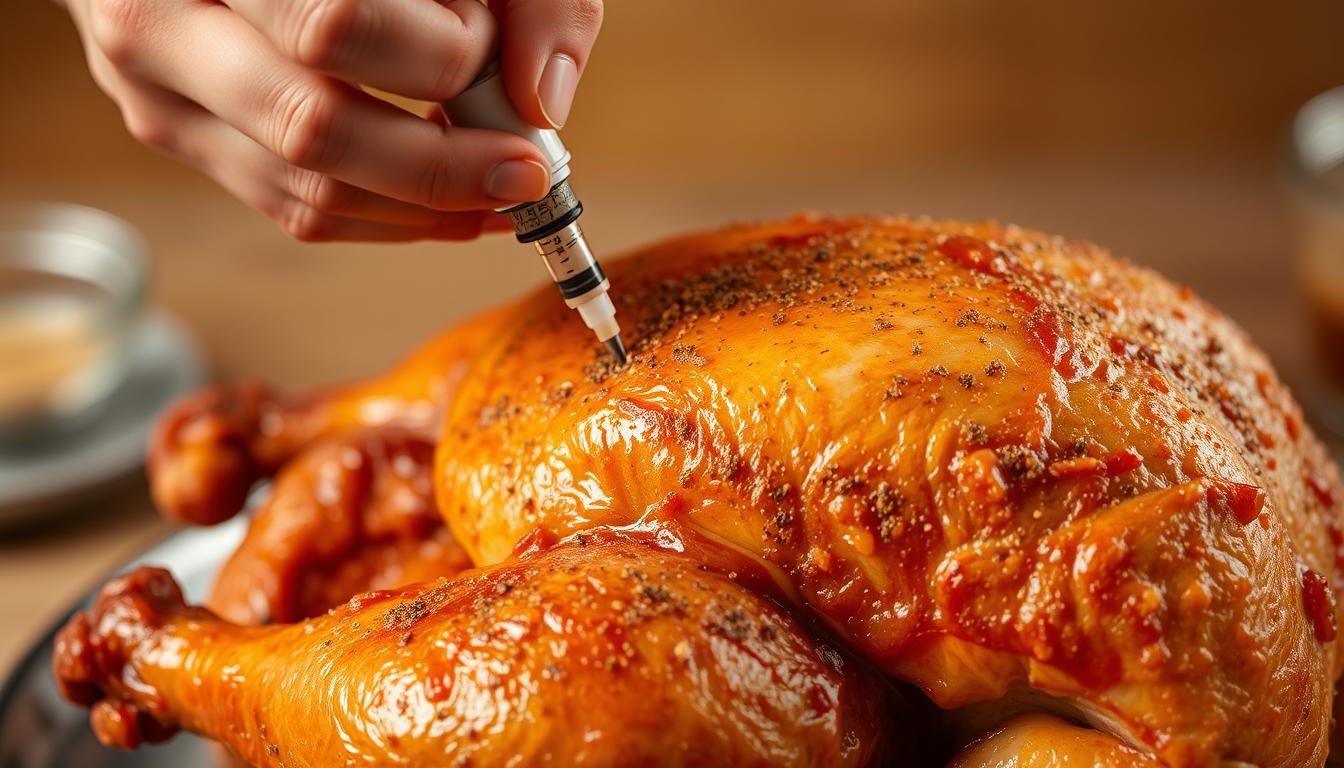
A methodical approach to placement and volume keeps the skin crisp and the meat uniformly seasoned. Start by making injection and loading your injector; purge air so every pull delivers steady liquid.
Position the bird breast-side up on a foil-lined sheet pan and map a grid across both breasts. Insert the needle deep, depress a small amount, withdraw slightly, then redirect at a new angle from the same entry point. Multiple angles from one puncture spread the mix without extra holes.
Repeat the same grid approach on thighs and drumsticks, but avoid bones and the cavity. Bones block flow and cause blowback; never push through into the cavity.
For frying, inject right before you lower the bird so the skin stays dry and ready to crisp. Work slowly: deliver small amounts per spot so the meat absorbs instead of pooling.
- Dab any leaks immediately with paper towels; for a butter-style injection, rub thin overflow into the skin if you plan to eat it.
- If the needle clogs, strain the mix again or fit a larger tip that still suits fine liquids.
- Keep the bird on the same pan after you inject so movement doesn’t push liquid back out. Do a quick visual check for leaks, then proceed to your fryer setup.
Frying the Bird: Time, Temp, and Doneness
Set the oil to 350°F, note your minutes per pound, and use quick thermometer checks to judge true doneness.
Preheat the oil to a steady 350°F and keep the burner adjusted so temperature swings stay small. Big drops in oil heat add time and make skin greasy.
Estimate 3.5–4 minutes per pound as your planning window. These minutes per pound are a guide only—always confirm with a thermometer in the thickest breast and thigh.
Lower slowly and monitor
Lower the bird slowly on a stand and pause as the legs hit the oil. Let bubbling settle to avoid overflow.
Watch minutes and temp together. If the oil falls, boost heat slightly so your total time doesn’t balloon.
Finish and rest
Remove the bird when the thermometer reads 160–165°F in the deepest meat. Let excess oil drain, then transfer to a foil-lined pan or rack.
Rest at least 15–20 minutes so carryover heat evens out and juices redistribute before carving.
| Step | Action | Why it matters |
|---|---|---|
| Preheat | Heat oil to 350°F and stabilize | Prevents greasy skin and uneven cook |
| Timing | Plan 3.5–4 minutes per pound | Gives a reliable window for most bird sizes |
| Check | Use an instant-read thermometer | Confirms safe doneness at 160–165°F |
| Rest | Drain and rest 15–20 minutes | Improves slicing and moisture retention |
Seasoning, Rubs, and Flavor Variations You Can Try
Small shifts in seasoning and rubs let you tailor the bird to match sides and mood. Choose whether you want bold heat, bright herbs, or a balanced mix that plays well with your menu.
Boost Cajun heat or keep it bright
Boost Cajun character with Creole seasoning, a jalapeño-forward rub, and a few drops of thin cayenne hot sauce in your interior mix.
Bright lemon-herb and garlic profiles
Prefer a lighter route? Lean on lemon, garlic, rosemary, and sage for an aromatic finish that cuts through rich skin.
- Keep surface seasoning light so the skin crisps; heavy, sugary rubs can darken in hot oil.
- Combine a mild interior mix with a restrained exterior rub so flavors meet without overwhelm.
- Use garlic powder and onion powder inside blends to avoid clogs, and save chunky bits for post-cook sauce or finishing.
- Test small batches on the stove to tweak salt, acid, and heat; write down successful recipes so you can repeat them.
Tip: Reserve thick glazes until after the cook. Drizzle thin sauces at serving to keep skin crisp and flavor balanced.
Rub vs Brine vs Injection: What You Should Choose for Frying
Choose your seasoning route based on how much time you have and how crispy you want the skin.
Brining soaks the bird in salted water to lock in moisture, but it takes many hours and leaves the surface wet. That surface wetness must be fully dried before you fry to avoid splatter and soggy skin.
Injection is the fastest way to drive flavor into the interior of a turkey or chicken. Use it when you miss the 24-hour brine window. For frying, make sure you inject right before you lower the bird so the skin stays dry and will crisp.
A simple rub still adds aroma and color. Apply sparingly to the exterior so sugars and spices don’t scorch in very hot oil. If you already brined thoroughly, a second push of liquid often offers little benefit and can push juices back out.
“Balance salt across brine, injection, and rub—it’s easy to overshoot and ruin the harmony of the plate.”
- Water-based injections keep skin drier; butter-rich mixes give mouthfeel but need extra drying.
- Time dictates the choice: brine if you have a day, inject if you have minutes, rub if you want quick simplicity.
- Document your method and salt amounts so you refine what works with your fryer and crowd.

| Method | Best when | Key downside |
|---|---|---|
| Brine | You have 12–24 hours; want deeply seasoned, moist meat | Surface wetness requires extended drying before frying |
| Injection | Short on time; need targeted interior flavor fast | Can force liquid back out if bird was brined; watch salt |
| Rub | Want crisp skin and simple prep | Heavy or sugary rubs can burn in hot oil |
Serving Ideas and Sides to Match Your Fried Turkey
Pair your crisp main with sides that balance heat, fat, and bright acidity for a crowd-pleasing plate. Choose a mix of creamy, smoky, and fresh items so people can customize each bite.
Comforts and cool contrasts
Serve a Loaded Jalapeño Popper Potato Salad for a cool, creamy contrast to rich skin. Bacon and tangy pickles cut through fat and refresh the palate.
Classic sides with a twist
Add a green bean casserole for holiday familiarity. A smoky twist on the bean casserole adds texture and deeper savory flavor.
- Bright lemon-dressed greens or crisp slaw to refresh between bites.
- Use carving-board drippings to make a quick gravy; the injected seasonings boost sauce complexity.
- Round out the table with cornbread, roasted sweet potatoes, or mac and cheese—reliable recipes that hold well.
- Offer sliced chicken as an alternative protein using the same base flavors scaled down.
- Portion sides by the cup or in quart containers to keep service smooth.
Finish with a warm apple dump cake and vanilla ice cream for a simple, seasonal ending that pairs well with smoky, savory mains.
Leftovers and Storage: Keep It Juicy Beyond Day One
Handle leftovers fast to lock in moisture and cut down spoilage risk.
Cool the bird quickly by transferring it to a foil-lined sheet pan right after resting. Let juices settle for a few minutes, then carve and portion so cooling happens in minutes, not hours.
Place cooled portions in airtight containers and store them in the fridge for up to 4 days. For longer life, freeze meal-size packs and label with date; frozen portions keep for up to 4 months.
- Reheat slices gently covered with a splash of water or broth for a few minutes to restore moisture.
- To revive skin texture, sear pieces briefly in a hot skillet with a thin film of oil until crisp.
- Portion by the cup for soups and casseroles so thawing is quick and waste is low.
Use the drippings. Injected pan juices add depth to gravy or a quick sauce. Do not store any leftover injection that touched raw poultry; discard and make fresh if needed.
| Action | When | Why |
|---|---|---|
| Cool on foil | Immediately after resting | Easy cleanup and safe handling |
| Fridge | Up to 4 days | Best for ready-to-eat servings |
| Freeze | Up to 4 months | Extends shelf life for meals |
Conclusion
Finish strong, and your plan turns into a repeatable win.
You can inject turkey confidently if you build a smooth, strained injection marinade from the right ingredients. Choose a water-based whisk-and-go mix for cleaner flow or a cooled butter blend for richer mouthfeel.
For frying success, make sure the bird is fully thawed, the skin is dry, and the oil is steady at 350°F. Use 3.5–4 minutes per pound as a guide, then rely on a thermometer to hit 160–165°F before you rest and carve.
Keep gear simple: a sturdy injector, an accurate thermometer, and a stable deep fryer remove guesswork. Store leftovers in the fridge and note the recipes that earn the most votes so you can repeat them.