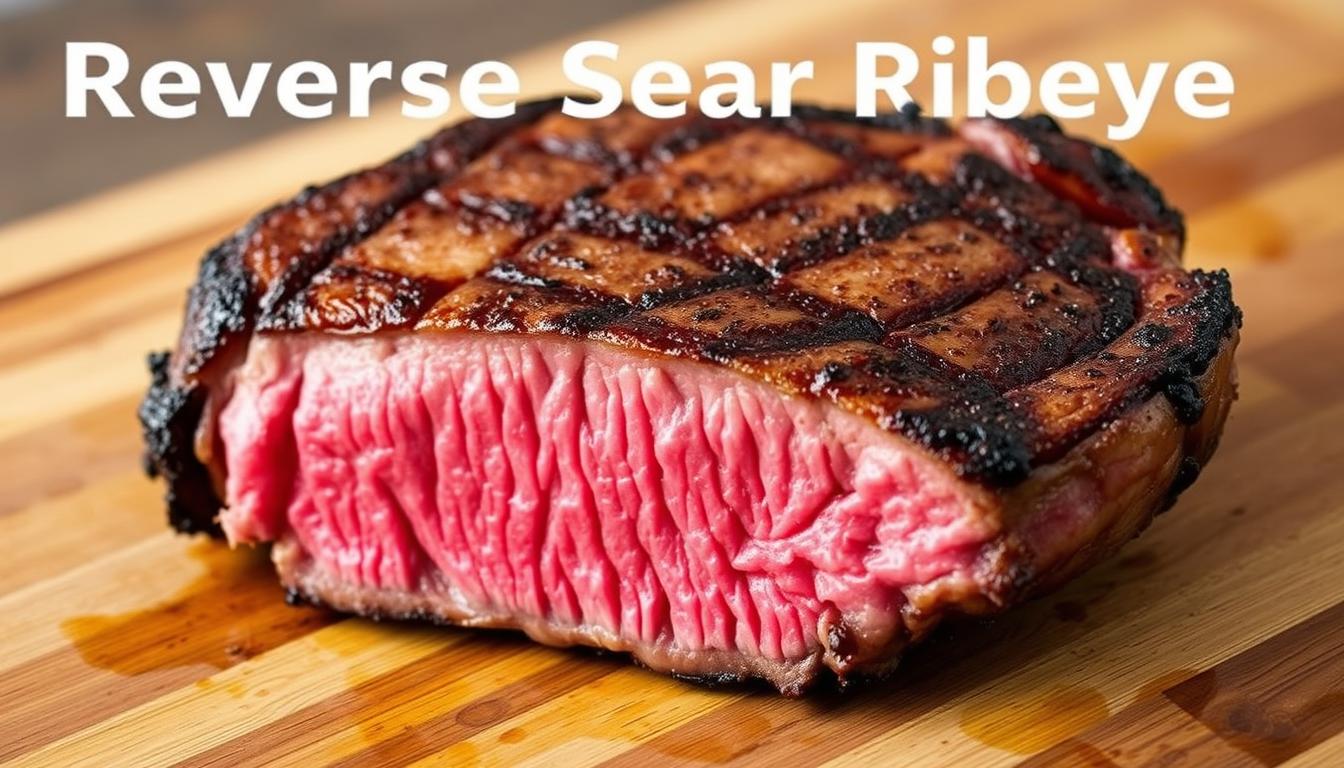
Reverse Sear Ribeye: The Secret to Tender, Flavorful Steak
Reverse Sear Ribeye Steak gives you that moment when a fork meets a perfectly cooked cut and it feels like victory. You’ve worked the grill, guessed the time, and still felt unsure about doneness—but this method gives you control, confidence, and calm in the kitchen.
Here you’ll learn a gentle roast-then-sizzle process that tames heat and nails temperature. The approach bakes the meat at low oven heat, then finishes with a quick, hot pan for a deep Maillard crust. That yields an even pink interior and bold surface flavor without endless smoke.
In the coming steps you’ll get clear targets for carryover and doneness. You’ll also see which cuts and thicknesses perform best, simple seasoning tips, and timing for a 1½–2-inch piece.
Table of Contents
What You’ll Learn Today and Why Reverse Sear Wins
You’ll learn a clear, repeatable workflow that produces an even pink center and a deep browned crust without endless smoke. Start low in the oven to control internal temperature, then finish with a very hot pan for quick browning.
Your goal: consistent color from edge to edge and a bold surface crust with minimal fuss. Gentle oven heat dries the surface, which helps the Maillard reaction when you apply high heat for 1–2 minutes per side.
When to use it: This approach shines with thick cuts about 1½–2 inches—think ribeye, New York strip, porterhouse, T-bone, or filet mignon. Thinner cuts cook too quickly to benefit from the slow roast phase.
Key practical notes:
- You’ll roast at 250–275°F until the interior is about 25–30°F below your target doneness.
- Sear briefly in a very hot skillet with a high smoke point oil to reduce smoke and finish fast.
- Simple gear—a rimmed sheet pan, wire rack, and a hot skillet—gives you predictable timing and restaurant-style results.
Why Reverse Sear Works: Low Heat First, High Heat Finish
Start slow to control the climb. Gentle oven heat lets you aim the internal temperature with precision. Cooking below 300°F activates cathepsin enzymes that tenderize beef up to roughly 122°F. That makes the meat more forgiving before the final night of heat.
Drying the surface matters. The warm oven pulls moisture from the exterior so the pan browns faster and with less sputter. A drier surface also speeds searing and reduces those dull gray bands around the edge.
Finish in a screaming-hot pan to lock in flavor. A properly preheated cast iron skillet holds heat so you get a deep Maillard crust in about 1–2 minutes per side. That brief, intense sear builds the golden-brown exterior while keeping the center evenly pink.
- You’ll control internal temperature more reliably with low heat first.
- Enzymes and gentle heat improve tenderness before searing.
- Surface drying enhances browning; cast iron keeps the pan hot for fast, flavorful searing.
Ingredients and Tools You Need for Steakhouse Results
Start by choosing cuts and gear that make temperature control simple. Pick well-marbled cuts about 1½–2 inches thick for the best texture and juiciness. Aim for ribeye, New York strip, or filet mignon to get consistent results in the oven and on the pan.
Seasoning and fats: Season generously with kosher salt and black pepper to highlight beef flavor. Add garlic and fresh herbs when you baste with butter at the end. Use a high smoke point oil such as vegetable oil or avocado oil for the initial sear so your kitchen stays smoke-free.
Essential equipment: Set steaks on a wire rack over a rimmed sheet pan to allow even air flow and surface drying. Preheat a cast iron skillet until it is blazing hot; a sturdy skillet holds heat for a fast crust. Rely on an instant-read thermometer to hit your target doneness without guessing.
“Choose the right cut, salt it well, and trust the thermometer.”
- Well-marbled cuts, 1½–2 inches thick for juiciness.
- Kosher salt, black pepper, garlic, butter for finishing.
- Wire rack, rimmed sheet pan, cast iron skillet, and thermometer.
Temperature and Timing Guide for Doneness
Dialing in temperature and time makes hitting your preferred doneness repeatable every cook. Track the internal temperature instead of guessing by sight. Use a reliable thermometer at the thickest point to confirm doneness.
Bake staging and oven expectations
Bake at 250–275°F. For 1½–2-inch cuts expect roughly 15–25 minutes in the oven. Check after 15 minutes, then every few minutes until you hit the bake-until range for your target.
Quick finish targets
Pull the meat about 25–30°F below your final serve-at temperature. The final high-heat finish will bring the internal climb into the serve window and create a browned crust in 1–2 minutes per side.
- Tip: Aim for the 125–130°F serve-at window for medium rare.
- Thicker cuts need more minutes; thinner cuts need closer monitoring.

| Doneness | Bake-until (°F) | Sear-until (°F) | Serve-at (°F) |
|---|---|---|---|
| Rare | 85–90 | 115–120 | 120–125 |
| Medium-rare | 90–95 | 120–125 | 125–130 |
| Medium | 100–105 | 130–135 | 135–140 |
| Well-done | 120–125 | 155 | 160 |
Quick checklist: bake at 250–275°F, check with a thermometer after 15 minutes, pull 25–30°F shy of final, finish hot for 1–2 minutes per side.
How to Cook a Reverse Sear Ribeye Steak in the Oven
Prep makes the difference: dry the surface, season well, and let the meat rest briefly before roasting. Set your oven to 250–275°F and line a sheet pan with foil. Place a wire rack on the pan so air circulates and the surface dries for better browning.
Prep and season
Pat each steak dry with paper towels. Evenly season both sides with salt and pepper. You can leave steaks at room temperature for 20–30 minutes or chill uncovered for 2–24 hours for an extra-dry exterior.
Slow roast
Place steaks on the rack and slide the pan into the oven. Roast until the interior is about 25–30°F below your serve target—usually 15–25 minutes for 1½–2-inch cuts.
Sear hot and fast
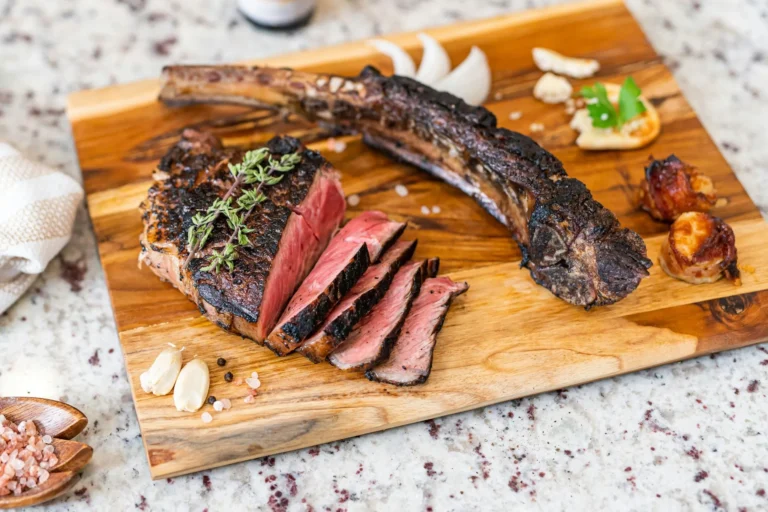
Preheat a cast iron skillet over high heat until it smokes lightly. Add a little vegetable oil and quickly sear 1–2 minutes per side in the skillet. Tip the meat on its sides to render the fat cap for 30–60 seconds.
Butter baste and edges
Lower heat, add butter, crushed garlic, and a sprig of thyme or rosemary. Baste for about a minute to layer rich aroma without pushing the interior past medium rare.
Thermometer checks and carryover
Verify doneness with an instant-read thermometer before and after the hot finish. Account for carryover when you pull the meat so you hit the target without overcooking.
- Set up a rack over a sheet pan.
- Pat dry, season, then place steaks for the oven run.
- Roast until 25–30°F shy of final, then sear hot and fast.
- Butter-baste with garlic and herbs; check with a thermometer.
Quick tip: use a thermometer and short, intense sears to lock texture and color while keeping the center perfect.
Reverse Sear on the Grill for Smoky Flavor
A two-zone grill gives you the best of both worlds: slow, even cooking on one side and intense char on the other. Set the indirect side to about 225°F and leave a hot direct side for finishing.

Two-zone setup and fuel options
Make one cool side and one blazing side whether you use pellet, charcoal, or gas. Place steaks on the indirect side to raise internal temperature gently.
Grill temps, cues, and finish
Cook on the cool side until the internal temp is about 10°F below your serve target (for medium rare, pull near 120°F). Typical time for 1.5-inch cuts is roughly an hour on the indirect side, but always verify with an instant-read thermometer.
- Move to the hot side and sear 2–3 minutes per side with the lid open.
- Keep a close eye on flare-ups and control color without overshooting doneness.
- After the hot pass, remove steaks to a platter, add butter, and rest ~10 minutes so juices redistribute.
Quick tip: watch temperature rather than the clock for repeatable results on the grill.
Serving, Sides, and Pro Tips
Deciding whether to slice now or wait can preserve crust and juice in different ways. You’ll slice against the grain for the most tender bites. Choose to rest for 5–10 minutes for juicier results or slice immediately to keep a crisp crust.
Finishing touches
Compound butter or a bright chimichurri/salsa verde—parsley, garlic, lemon, chiles, and olive oil—adds contrast to rich beef. A simple salt pepper garlic rub keeps pure flavor front and center.
Smoke control and kitchen setup
Minimize smoke by using a high smoke point oil and a fully preheated cast iron pan or iron skillet. Turn on strong ventilation and keep a fan or range hood running.
Timing and plating
Place steaks on a rack or warm plate while they rest so the bottom won’t steam and lose crust. Use a quick thermometer check before you remove steaks to confirm the exact target has been reached. Manage the final minute so carryover doesn’t push your steak past the ideal doneness.
Pro tip: a short rest often equals juicier slices, while slicing right away preserves a dinner-table-worthy crust.
Conclusion
You now have a simple, repeatable plan for restaurant-quality results at home.
Reverse sear delivers a more even pink interior, stronger Maillard crust, and fewer smoky surprises when you control oil, ventilation, and sear time.
Use 250–275°F in the oven, pull about 10–30°F shy of your target, then finish with a 1–2 minute high-heat blast. Thick cuts like ribeye and similar premium cuts respond best.
Trust your thermometer, keep a quick finish on the pan or two-zone grill, and rest briefly before slicing. You’re ready to cook with confidence and serve reliably perfect results every time.